Customization
Identity Experience Framework is a ready to use solution for web pages available on a dedicated instance of LoginRadius, which is hosted on the LoginRadius server. The IDX has pre-configured features like registration, login and forgot password and more including multiple themes.
IDX reflects the functional and UI aspects of the configurations made in the Admin Console. This guide will take you through the customizing specific design aspects(UI/UX) of the IDX.
It covers the customization of web pages like Registration, Login and Profile using HTML, CSS, and Scripts and even changing its theme.
Prerequisites:
- For Basic Theme: Basic knowledge of HTML, CSS, and JavaScript.
- For Advance Themes: Advance knowledge of HTML, CSS and JavaScript.
To access the IDX, login to your Admin Console account and navigate to the Deployment >Identity Experience Framework. Our IDX consists of the following themes over which you can have the different levels of customizations available, which you can customize as per your requirements:
- Basic Theme
- Advanced Theme
Basic Theme Editor
Basic theme customization not required high-level technical knowledge, as we have provided ready to use options for customization. All you need to do is select the option which you want to use in your theme.
The following screen displays how you can select the Basic Theme:

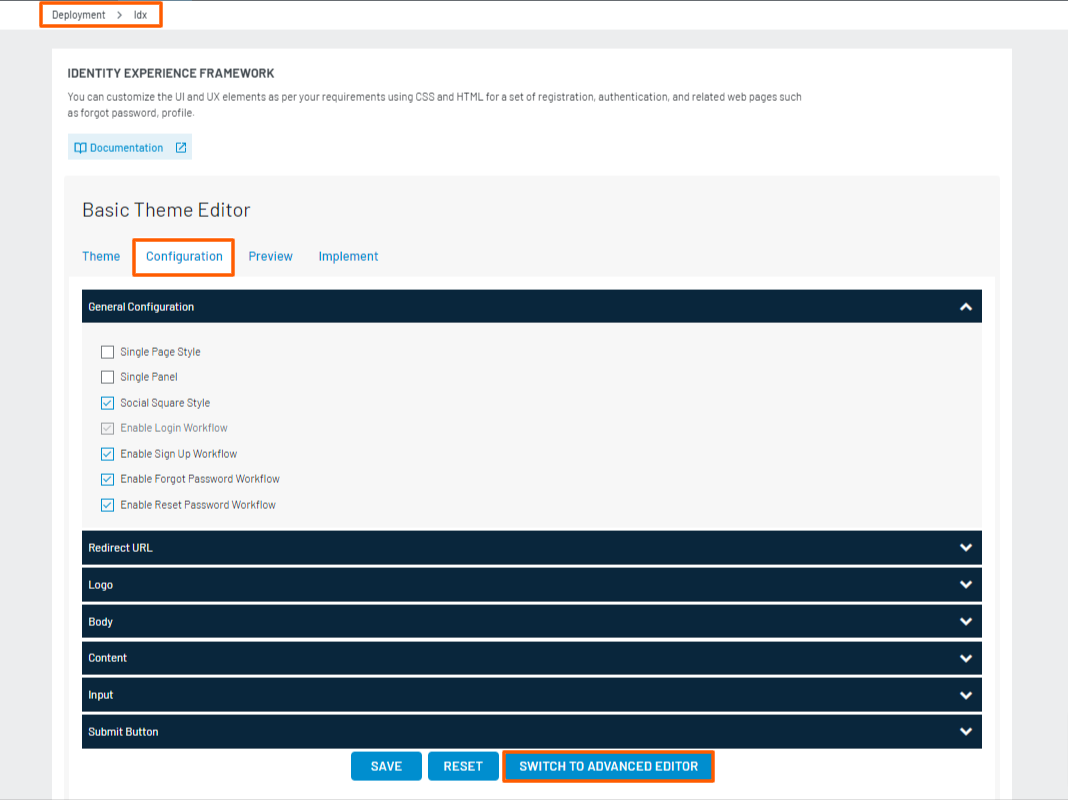
Step 1: To customize the Identity Experience Framework page, navigate to Deployment > Identity Experience Framework > Basic Theme Editor > Theme. Select the Basic Theme and click on the Customize button as shown in the screen.
Step 2: Select the Configuration tab and here you will see the provided setting for Basic Theme, as shown in the below screenshot. You can customize/beautify your theme by clicking any of the settings as per your requirement.

Step 3: After customizing the settings, click on the Save button to save the settings. And, if you want to reset all your changes then click on the Reset button.

Step 4: Select the Preview tab to preview your beautified/customized theme, as shown in the below screen.

Step 5: Select the Implement tab to see the URLs of the Identity Experience Framework, as shown in the below screenshot.

Advanced Theme Editor
Step 1: To customize the Identity Experience Framework Advanced Theme, navigate to Deployment > Identity Experience Framework.
Step 2: Here, by default, the Advanced Theme will be selected, you can either proceed with the same or you can select other Advanced Editor Only Theme and then click on the Customize button as shown in the screen.

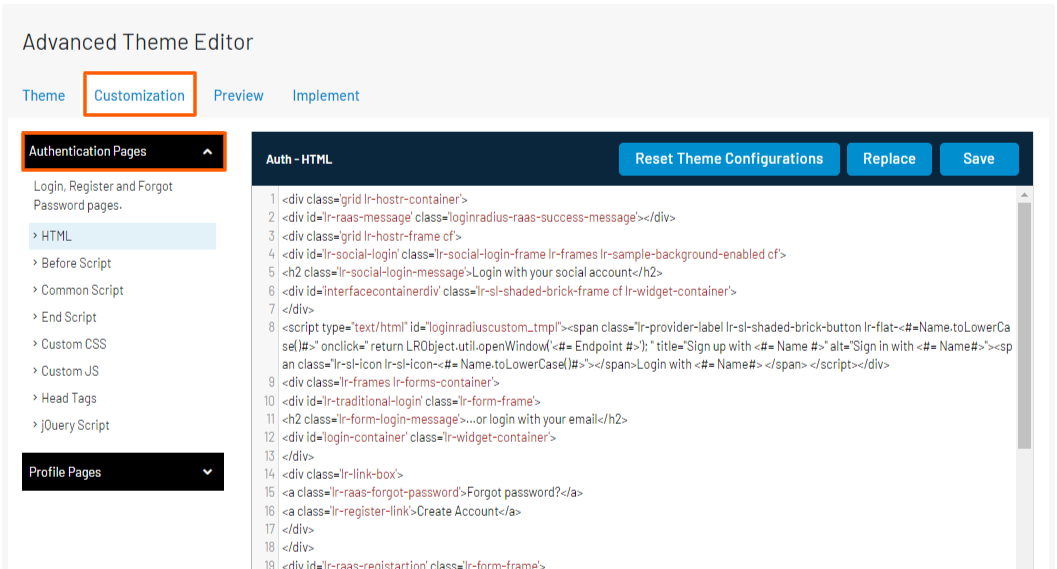
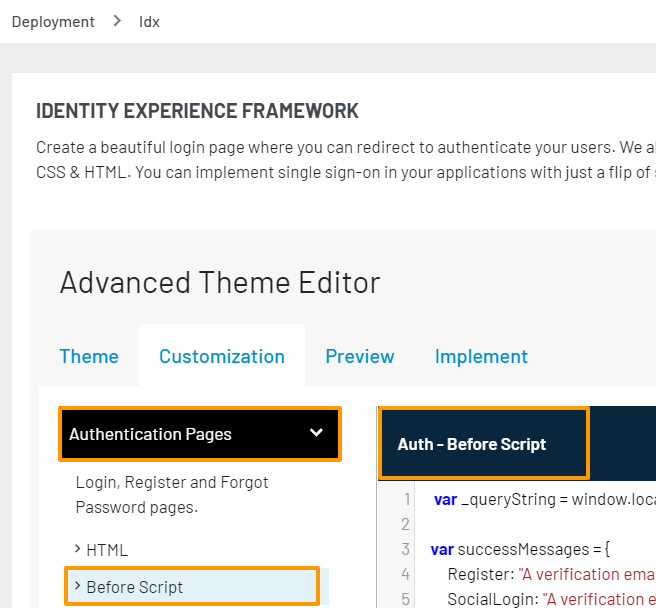
Step 3: Select the Customization tab and click on Authentication Page tab as shown in the below screenshot:
-
HTML BODY : This section is used to customize the customizable portion of the Identity Experience Framework page. This is the section that contains the interface and should not be a full page. You can review a sample of the default customizable content in the package "hosted-page/authentication-page-sample/authentication-page-sample.html".
-
Before Script : Before script file is provided with 2 options one is ‘Replace’ where you can upload a new file or Add URL and another one is ‘Before-Script.js’ where you can update the existing JS File. This should set to a specific js reference like the default js file which is included in the customization package that you can download here, the standard "default-auth-before-script.js" is found in the package "hosted-page/authentication-page-sample/default-auth-before-script.js". This script handles the LoginRadius interfaces and functionality of the Identity Experience Framework page. Following are the functionality handled by the Before script:
- Login To handle login functionality refer the below code, it handles login, login container, success, error.
lr_raas_settings.login = {};
lr_raas_settings.login.containerid = "login-container";
lr_raas_settings.login.success = function (response, flag) {
     if (response.access_token) {
        redirectToReturnUrl(response.access_token);
    }
    else {
        if(response.AccountSid || (response.IsPosted && response.Data && response.Data.AccountSid)){
          setMessage(successMessages.ResendOTP);
        }
       else if (_queryString.indexOf('return_url') != -1) {
        registrationSuccess('register');
    } else {
        if(flag == 'register'){
             setMessage(successMessages.Register);
       resetForm('loginradius-registration');
        }
        else {
        setMessage(successMessages.InstantLink);
        resetForm('loginradius-login');
    }
    }
    }
};
lr_raas_settings.login.error = function (errors) {
    if (!errors[0].rule)
        setMessage(errors[0].Description, true);
};- Registration To handle registration functionality refer the below code, it handles registration, registration container, success, error.
  var lr_raas_settings = window.lr_raas_settings || {};

lr_raas_settings.registration = {};
lr_raas_settings.registration.containerid = "registration-container";
lr_raas_settings.registration.success = function (response) {
    if (response.access_token) {
        redirectToReturnUrl(response.access_token);
    }
    else {
        if (queryString.return_url) {
            registrationSuccess('register');
        } else {
            setMessage(successMessages.Register);
            resetForm('loginradius-raas-registration');
        }
    }
};
lr_raas_settings.registration.error = function (errors) {
    if (!errors[0].rule)
        setMessage(errors[0].message, true);
};- Forgot Password To handle Forgot Password functionality refer the below code, it handles forgot password, forgot password container, success, error.
lr_raas_settings.forgotpassword = {};
lr_raas_settings.forgotpassword.containerid = "forgotpassword-container";
lr_raas_settings.forgotpassword.success = function (response) {
    if (queryString.return_url) {
        registrationSuccess('forgotpassword');
    } else {
        setMessage(successMessages.PasswordForgot);
        resetForm('loginradius-raas-forgotpassword');
    }
};
lr_raas_settings.forgotpassword.error = function (errors) {
    if (!errors[0].rule)
        setMessage(errors[0].message, true);
};- Profile page To handle Profile page functionality refer the below code, it handels profileEditor, profileEditor.container, success, error.
window.lr_raas_settings.profileEditor = {};
window.lr_raas_settings.profileEditor.containerid = "profile-editor-container";
window.lr_raas_settings.profileEditor.error = function (errors) {
    if (!errors[0].rule)
        setApiMessage(errors);

};
window.lr_raas_settings.profileEditor.success = function (response) {
    setMessage(successMessages.ProfileUpdated);
}; -
END SCRIPT : This should be another script reference similar to the Before Script and Loads after the page has been loaded.
You can use this part of you IDX page files for configuring multiple social apps, for more information, refer to this document.
-
Additional Scripts : You can add in additional scripts and CSS references using the following option.
-
Head Tags: Can be used to add js references to the header
-
Custom CSS: add additional CSS references
-
Custom js: Add additional js references.
Step 4: Select the Preview tab to preview your customized theme, as shown in the below screen.

Step 5: Select the Implement tab to see the URLs of the Identity Experience Framework, as shown in the below screenshot.

Basic or Advanced Editor Theme
We have provided a Theme which can be customized by Basic and Advanced Editor both as shown in the below screen.
Note:
- In order to customize the theme by Advanced Theme Editor, click on Switch to Advanced Theme Editor as shown in the above screen and customize further as explained in the above Advanced Theme Editor steps.
- In order to customize the theme by Basic Theme Editor follow the steps given above in Basic Theme Editor.
The following sections explain the customization options specific to each page:
Authentication Page
This section covers the customization that you can implement on our Authentication Page.
Part 1 - HTML Customization
This section will take you through the HTML customizations steps for the Authentication Page:
Step 1: Login to your Admin Console account and navigate to Deployment >Identity Experience Framework
The following screen will appear:

Step 2: Make sure that the Authentication Pages option is selected from the left navigation panel. Under the HTML, write code as per your requirement to customize the HTML of Authentication Page.
The following displays the HTML with default code:

Step 3: After making the changes, click the Save button to save the updated HTML code.
Part 2 - CSS Customization
This section will take you through the CSS customization steps for the Authentication Page:
Step 1: Login to your Admin Console account and navigate to Deployment >Identity Experience Framework
The following screen will appear:

Step 2: Make sure that the Authentication Page option is selected from the left hand side panel. Click the Custom CSS option from the left navigation panel. It displays the CSS files as displayed in the screen below:
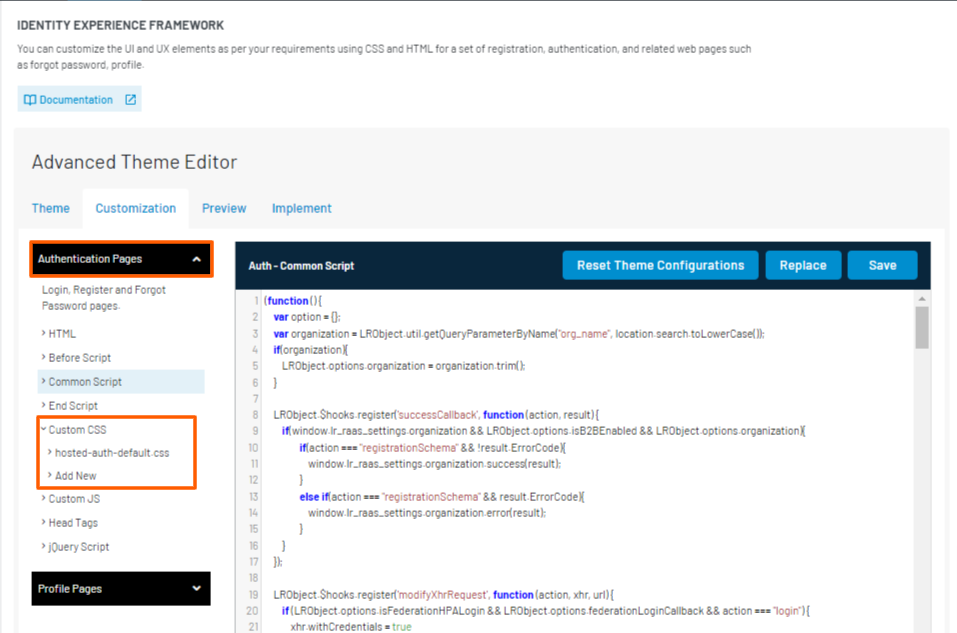
Step 3: Click the hosted-auth-default.css file and you can either update the CSS file as per your requirement or you can add a new file by clicking on Add new button.
Step 4: Click the Save button (in case you have updated the file) to save the updated CSS file.
Part 3 - JavaScript Customization
This section will take you through the JavaScript customization steps of the Authentication Page by making changes in relevant JS files:
Step 1: Login to your Admin Console account and navigate to Deployment >Identity Experience Framework
The following screen will appear:

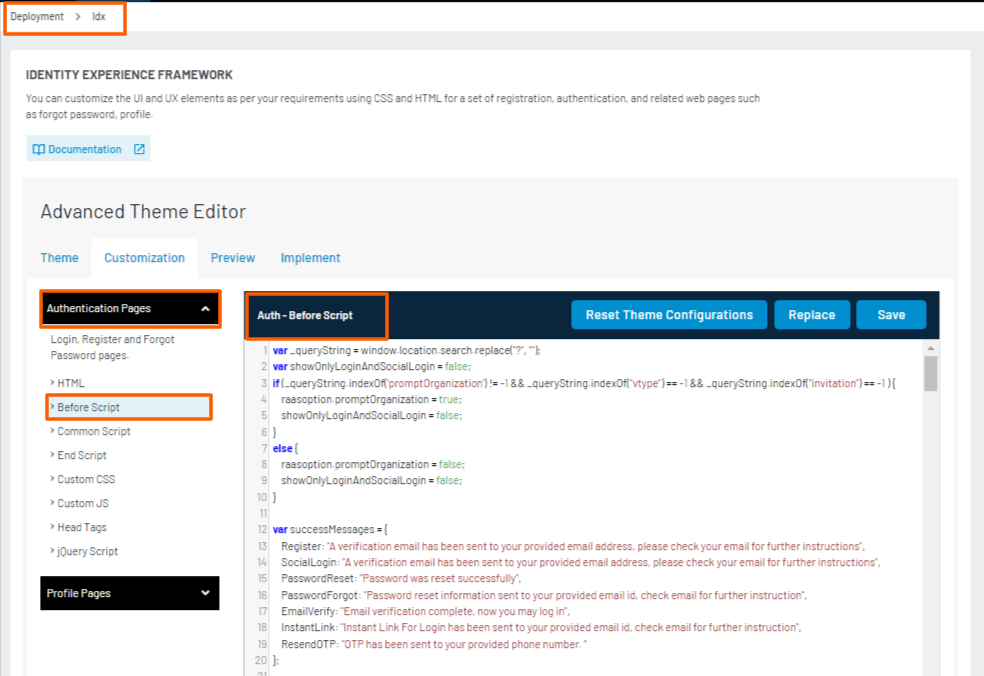
Step 2: Make sure that the Authentication Pages option is selected from the left hand side panel. Click the script (End or Before) folder from the left navigation panel. For example, click the Before Script folder and default Auth - Before Script file will be displayed as shown in the screen below:
Update the JS file as per your requirements. For advanced JS customizations options available in the LoginRadius Identity Platform, refer to this document.
Also, few customizations options are directly available in the Auth - Before Script file and you can make the desired changes as explained below:
-
Manage Success Messages: Find successMessages function in default Auth - Before Script and update the message as per your requirements.
The following screen displays the default success messages:
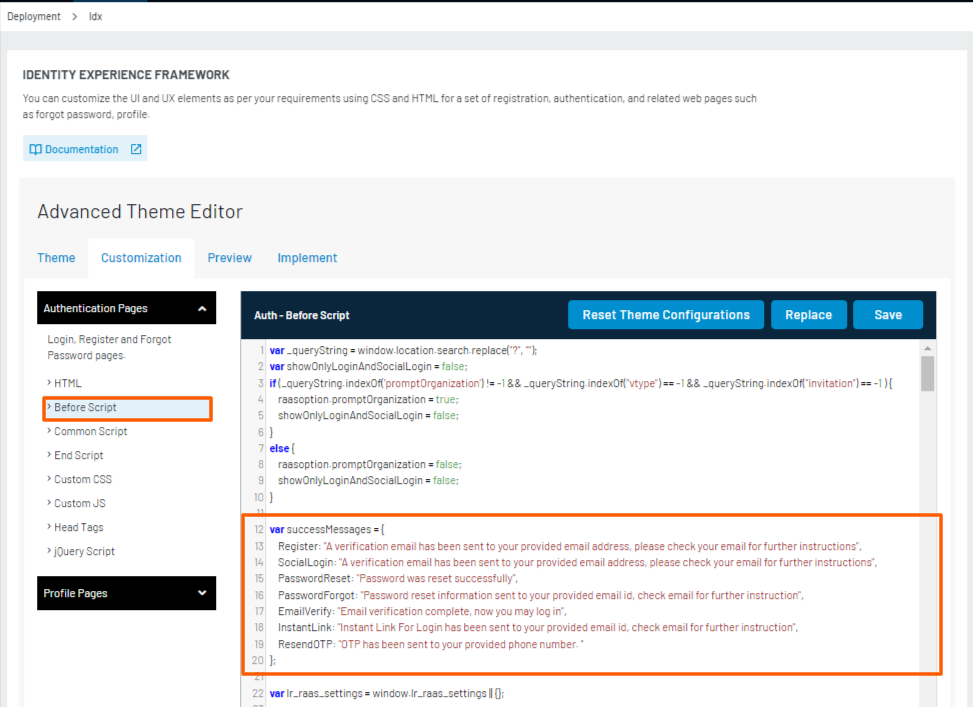
Update these messages as per your requirements and then click the Save button.
-
Manage Loading Image: Find visibleLoadingSpinner function in default Auth - Before Script and customize it according to your requirements.
-
Manage Callback: Find redirectToReturnUrl function in default Auth - Before Script and customize it according to your requirements.
-
Manage Form Settings: Find showLogin, showRegister, showForgotPassword functions in default Auth - Before Script and customize them as per your requirements. The updates must be added just below the default code available in the respective function.
-
Message Settings: Find setMessage function in default Auth - Before Script and customize it as per your requirements.
Step 3: Click the Save button to save the updated JS file.
NOTE: We have one Common Script, which previously appeared on your IDX as "auth-common.js" and was non-editable. However, this new JS, i.e., Common Script, allows you to edit the common JS to customize the desired functionality/flow. The default JS will appear on the IDX if there are no edits.
Part 4 - Container Customization
This section will take you through the available containers for the Authentication Page and their customization:
- Social Login Container
- Required Information Pop-up
- Traditional Login Page
- Registration Page
- Forgot Password Page
To populate the containers, you need to include HTML tags and JavaScript code as explained below:
Social Login Container
This container will load the social login interface on your Authentication Page. The following is the code snippet:
<div id="interfacecontainerdiv"></div>
Note: Where
interfacecontainerdivis the default id for loading the social login container. To change the above id, you need to change the value oflr_raas_settings.sociallogin.interfaceidin the Auth - Before Script.
The following is the default code of the template used for the Social Login Interface:
<script type="text/html" id="loginradiuscustom_tmpl">
        <span class="lr-provider-label lr-sl-shaded-brick-button lr-flat-<#=Name.toLowerCase()#>" onclick=" return LRObject.util.openWindow('<#= Endpoint #>'); " title="Sign up with <#= Name #>" alt="Sign in with <#= Name#>">
                <span class="lr-sl-icon lr-sl-icon-<#= Name.toLowerCase()#>"></span>
                     Login with <#= Name#>
          </span>
</script>
Note: You can modify the above template from the HTML body panel as per your design requirements. But to change the script id, you need to change the value for
lr_raas_settings.sociallogin.templateidin the Auth - Before Script.
Required Information Pop-up
This container will load the required information pop-up during the social login, if any of the required marked field value is not provided by the social provider. The following is the code snippet:
<div id="sociallogin-container"></div>
You can change the above id by updating the value of lr_raas_settings.sociallogin.containerid in the Auth - Before Script.
Traditional Login Page
This container will load the default traditional login interface. The following is the code snippet:
<div id="login-container"></div>
You can change the above id by updating the value of lr_raas_settings.login.containerid in the Auth - Before Script.
Registration Page
This container will load the default registration interface. The following is the code snippet:
<div id="registration-container"></div>
You can change the above id by updating the value of lr_raas_settings.login.containerid in the Auth - Before Script.
Forgot Password Page
This container will load the default forgot password interface. The following is the code snippet of div:
<div id="forgotpassword-container"></div>
You can change the above id by updating the value of lr_raas_settings.login.containerid in the Auth - Before Script.
Profile Page
This section covers the customization that you can implement on our Profile Page.
Part 1 - HTML Customization
This section will take you through the HTML customizations steps for the Profile Page:
Step 1: Login to your Admin Console account and navigate to Deployment >Identity Experience Framework
The following screen appears:

Step 2: Make sure that the Profile Page Files option is selected from the drop-down available in the left navigation panel. Under the Profile HTML files, write code as per your requirement to customize the HTML of Profile Page.
The following displays the Profile HTML files with default code:

Step 3: After making the changes, click the Save button to save the updated HTML code.
Part 2 - CSS Customization of Profile Page
This section will take you through the CSS customization steps for the Profile Page:
Step 1: Login to your Admin Console account and navigate to Deployment >Identity Experience Framework
The following screen will appear:

Step 2: Make sure that the Profile Page Files option is selected from the drop-down. Click the Custom CSS folder from the left navigation panel. It displays the CSS files as displayed in the screen below:
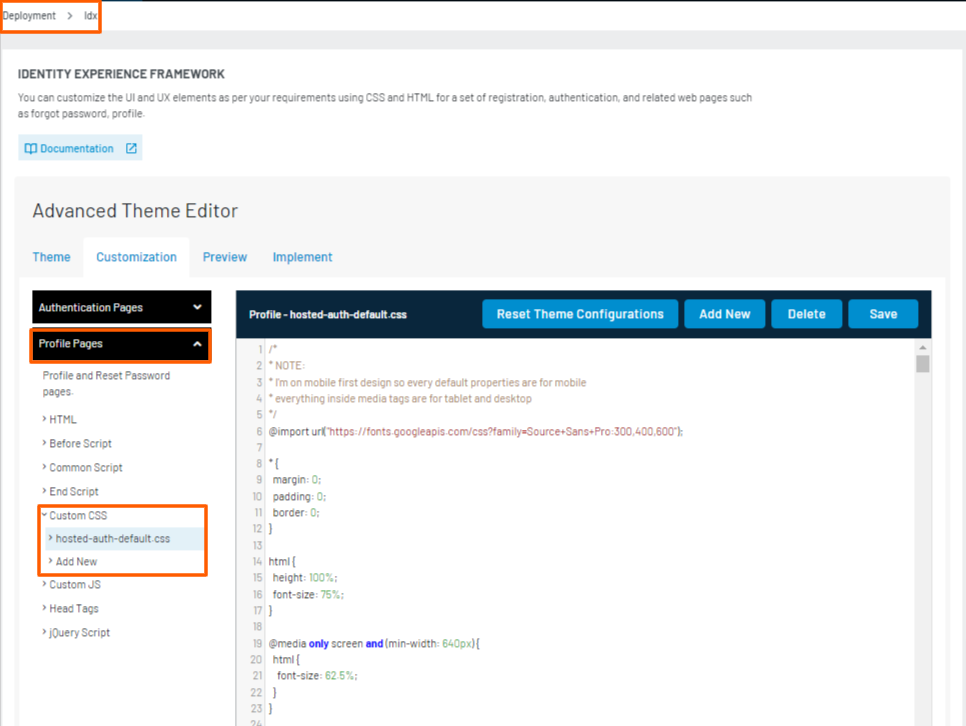
Step 3: For replacing the CSS file with your custom CSS, upload the file and click the Confirm button to load the new CSS file.

Part 3 - JavaScript Customization
This section will take you through the JavaScript customization steps of the Profile Page by making changes in relevant JS files:
Step 1: Login to your Admin Console account and navigate to Deployment >Identity Experience Framework
The following screen will appear:

Step 2: Make sure that the Profile Page Files option is selected from the drop-down. Click the script (End or Before) folder from the left navigation panel. For example, click the Before Script folder to make changes in Profile- Before Script file as displayed in the screen below:

Click the Save button to load the JS file. Update the JS file as per your requirements. For advanced JS customizations options available in the LoginRadius Identity Platform, refer to this document.
Also, few customizations options are directly available in the default Profile- Before Script file and you can make the desired changes as explained below:
- Manage Messages: Find successMessages function in Profile - Before Script and update the message as per your requirements. As displayed in the screen below:

-
Manage Loading Image: Find visibleLoadingSpinner function in Profile - Before Script and customize it as per your requirements.
-
Manage Edit Profile: Find LoginRadiusRaaS.$hooks.setRenderProfileEditor function in Profile - Before Script and customize it as per your requirements. The updates must be added just below the default code available in the respective function.
-
Manage Message Settings: Find setMessage function in Profile - Before Script and customize it as per your requirements.
Part 4 - Container Customization
This section will take you through the following available containers for the profile page customization:
To populate the containers, you need to include HTML tags and JavaScript code as explained below:
Social Linking Interface
This container will load the social linking interface on the profile page. The social linking interface consist of the following two containers:
- Linked Account
- Not Linked Account
The Linked Account container displays all the linked user social profiles. You can also use it to unlink the already linked social profile. To implement this container use the following code snippet:
<div id="lr-linked-social"></div>
You can change the above id by updating the value of window.lr_raas_settings.accountLinking.containerid in the default Profile - Before Script.
The following is the default code template for populating the Linked Account:
<script type="text/html" id="linkedAccountsTemplate">
    <# if(isLinked) { #>
        <div class="lr-social-account">
            <span class="lr-social-icon lr-flat-<#= Name.toLowerCase() #> button-shade lr-sl-icon lr-sl-icon-<#= Name.toLowerCase() #>"></span>
            <span class="lr-social-info"><#= Name #></span>
            <span class="lr-social-unlink"><a onclick='return window["loginradiusv1"]? unLinkAccount(\"<#= Name.toLowerCase() #>\",\"<#= providerId #>\") : LRObject.util.unLinkAccount(\"<#= Name.toLowerCase() #>\",\"<#= providerId #>\")'>Unlink</a></span>
        </div>
        <# } #>
</script>
Note: You can change the above template as per your design requirements. You can update script id by updating the value of
window.lr_raas_settings.accountLinking.linkedAccountsTemplatein the default Auth - Before Script.
The Not Linked Account container is used to link all the social profiles that are not yet linked. To implement this container use the following code snippet:
<div id="lr-not-linked-social"></div>
You can change the above id by updating the value of window.lr_raas_settings.accountLinking.containerid in the default Profile- Before Script.
The following is the default code template for populating the Not Linked Account:
<script type="text/html" id="notLinkedAccountsTemplate">
  <# if(!isLinked) { #>
    <span class="lr-social-icon lr-flat-<#= Name.toLowerCase() #> button-shade lr-sl-icon lr-sl-icon-<#= Name.toLowerCase() #>" onclick='LRObject.util.openWindow("<#= Endpoint #>");'></span>
  <# } #>
</script>
Profile Editor Interface
This container will load the profile editor interface on your Profile Page, which is used to edit the user profile. To implement this container use the following code snippet:
<div id="profile-editor-container"></div>
You can change the above id by updating the value of window.lr_raas_settings.profileEditor.containerid in the default Profile - Before Script.
Set Password Interface
This container will load the set password interface on your Profile page, which is used to set the password directly without entering the old password. To implement this container use the following code snippet:
<div id="set-password"></div>
You can change the above id by updating the value of window.lr_raas_settings.setPassword.containeridin the default Profile - Before Script.
Change Password Interface
This container will load the change password interface on your Profile Page, which is used to change the password by asking the old password. To implement this container use the following code snippet:
<div id="change-password"></div>
You can change the above id by updating the value of window.lr_raas_settings.changePassword.containerid in the default Profile - Before Script.
Basic Theme Profile Page
1. Markup
The Basic Theme Profile Page is fully customizable. You can modify the HTML layout as per your requirements. In order to populate the containers, we have to include some JavaScript handlers to help make the associations between LoginRadius scripts and the Identity Experience Framework Registration page.
Social Linking Interface
The default Social Linking Interface is comprised of two templates, the first Linked Account template is assigned to the following container:
<div id="lr-linked-social"></div>
You can change the above id but will also need to modify the default-profile-before-script.js by changing the value for window.lr_raas_settings.accountLinking.containerid to your new id.
The actual template is defined using the following script:
<script type="text/html" id="linkedAccountsTemplate">
    <# if(isLinked) { #>
        <div class="lr-social-account">
            <a
                onclick='confirmationd("Unlink My Account","Are you sure? You want to unlink <#= Name.toLowerCase() #> account?","unlinksocial","<#= Name.toLowerCase() #>","<#= providerId #>");'
                title="Unlink <#= Name #>" alt="Unlink the <#=Name#> account">
                <span
                class="lr-social-icon lr-flat-<#= Name.toLowerCase() #> button-shade lr-sl-icon lr-sl-icon-<#= Name.toLowerCase() #>"
                ></span
           ></a>
        </div>
    <# } #>
</script>
You can modify the above template as per your design requirements but if you change the script id you will need to modify the default-profile-before-script.js by changing the value for window.lr_raas_settings.accountLinking.linkedAccountsTemplate to your new id.
The second part of the account linking interface is the Not Linked Account template and is assigned to the following container:
<div id="lr-not-linked-social"></div>
You can change the above id but will also need to modify the default-profile-before-script.js by changing the value for window.lr_raas_settings.accountLinking.containerid to your new id.
The actual template is defined using the following script:
<script type="text/html"
    id="notLinkedAccountsTemplate"><# if(!isLinked) { #> <span class="lr-social-icon lr-flat-<#= Name.toLowerCase() #> button-shade lr-sl-icon lr-sl-icon-<#= Name.toLowerCase() #>" onclick='LRObject.util.openWindow("<#= Endpoint #>");'title="Sign up with <#= Name #>" alt="Sign in with <#=Name#>"></span><# } #>
</script>
You can modify the above template as per your design requirements but if you change the script id you will need to modify the default-profile-before-script.js by changing the value for window.lr_raas_settings.accountLinking.linkedAccountsTemplate to your new id.
Update Profile
The default Profile Editor interface is set to the following container:
<div id="profile-editor-container"></div>
You can change the above id but you will also need to modify the default-profile-before-script.js by changing the value forwindow.lr_raas_settings.profileEditor.containeridto your new id.
Add Email
The default Add Email interface is set to the following container:
<div id="addemail-container"></div>
You can change the above id but you will also need to modify the default-profile-before-script.js by changing the value for addemail_options.container to your new id.
Change Password
The default Change Password interface is set to the following container:
<div id="change-password"></div>
You can change the above id but you will also need to modify the default-profile-before-script.js by changing the value for window.lr_raas_settings.changePassword.containerid to your new id.
2.Custom Styling
You can customize the CSS styling applied to the page by making changes to the provided hosted-auth-default.css according to your design/branding requirements.
3. Custom Scripts
You can control some additional functionality from the default-profile-before-script.js and include any additional JS you would like to further customize the interfaces based on our documentation
The following customizations are included in the provided default-profile-before-script.js:
To change the messages: Find function successMessages in default-profile-before-script.js and change the message according to your requirements.
To change the Loading image: Find function visibleLoadingSpinner in default-profile-before-script.js and customize it to your requirements.
To change the message settings: Find functions setMessage in default-profile-before-script.js and customize it to your requirements.
Advanced Customization (Authentication and Profile)
This section will take you through the following advanced customization options available for Authentication and Profile page the IDX:
- Loading Spinner
- Remember Me
- Implementing IDX as pop-up
Loading Spinner
This section will help you to customize the loading spinner on your IDX according to your requirements. There are following ways through which the loading spinner can be customized:
- Jumping Dots: You can change the colors of the default jumping dots animation as per your site theme.
- GIF Image: You can specify the custom GIF image as a loading spinner by changing the existing structure of jumping dots animation.
Part 1 - Jumping Dots
This section will take your through the steps to change the color of the jumping dots as per your web application theme. The following screen displays the default jumping dots as loading spinner:

Step 1: To change the colors of jumping dots loading animation, you need to download the CSS of the Identity Experience Framework from the following link: https://cdn.lrcontent.com/hub/prod/v1/css/hosted-auth-default.css
Step 2: Edit the downloaded CSS and provide the color values according to the theme in the existing CSS classes as follows:
.lr-loading-screen-overlay .load-dot{
    background: <theme-color-light>;
}

@-webkit-keyframes shapes {
    0% {
        -webkit-transform: translatey(-5px);
        transform: translatey(-5px);
    }

    50% {
        -webkit-transform: translatey(5px);
        transform: translatey(5px);
        background: <theme-color-dark>;
    }

    100% {
        -webkit-transform: translatey(-5px);
        transform: translatey(-5px);
    }
}

@keyframes shapes {
    0% {
        -webkit-transform: translatey(-5px);
        transform: translatey(-5px);
    }

    50% {
        -webkit-transform: translatey(5px);
        transform: translatey(5px);
        background: <theme-color-dark>;
    }

    100% {
        -webkit-transform: translatey(-5px);
        transform: translatey(-5px);
    }
}
Save the above css changes.
Step 3: To apply the loading spinner changes on the authentication page, navigate to Deployment > Identity Experience Framework
Make sure that the Auth Page Files option is selected in the drop-down given in the left navigation panel. Select the Custom CSS > Add New options as displayed in the screen below:

Click the Add New option and it displays the following pop-up:

Upload the saved CSS file or enter the file URL and click the Confirm button. Upon confirmation, the new CSS file is used to display the loading spinner on the authentication page.
or
To update the loading spinner changes in the Profile page, navigate to Deployment > Identity Experience Framework
Make sure that the Profile Page Files option is selected from the drop-down given in the left navigation panel. Select the Custom CSS > Add New options as displayed in the screen below:

Click the Add New option and it displays the following pop-up:
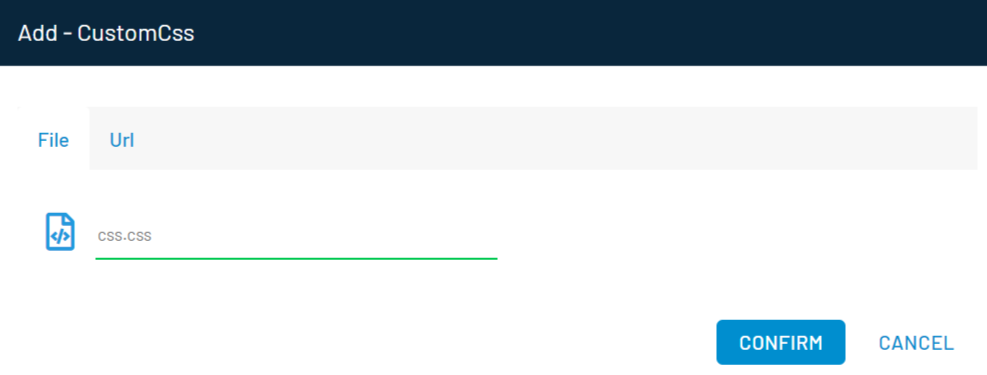
Upload the saved CSS file or enter the file URL and click the Confirm button. Upon confirmation, the new CSS file is used to display the loading spinner on the profile page.
Part 2 - GIF Images
This section will take you through the steps to change the loading spinner image by replacing the existing jumping dots animation with the new structure:
Step 1: Navigate to Deployment > Identity Experience Framework. Select the Auth Page File or Profile Page Files option from the drop-down given in the left navigation panel.
Locate the following code in the Auth Page File or Profile Page Files:
<div class='lr_fade lr-loading-screen-overlay' id='loading-spinner'>
<div class='load-dot'></div>
<div class='load-dot'></div>
<div class='load-dot'></div>
<div class='load-dot'></div>
</div>
Step 2: Replace the above code with the following and click the Save button.
<div class="lr_fade lr-loading-screen-overlay" id='loading-spinner'>
        <img src="<loading-image-gif-url>" width="50" >
</div>
Note: It is recommended to use the transparent GIF image background without any additional padding for better adaptability.
Once you have update the gif image you can customize its alignment, faded overlay and more using following steps:
Step 3: Download the CSS file of the auth/profile page from the following link:
https://cdn.lrcontent.com/hub/prod/v1/css/hosted-auth-default.css
Step 4: Edit the downloaded CSS file and add the following CSS class for defining the path of the custom GIF image:
.lr-loading-screen-overlay-img{
  background-color: rgba(255, 255, 255, 0.91);
  text-align: center;
  display: flex;
  justify-content: center;
  align-items: center;
  height: 100vh;
  width: 100vw;
  margin: 0;
  position: fixed;
  top: 0;
  left: 0;
  bottom: 0;
  right: 0;
  z-index: 9999;
}
**Save **the CSS file.
Step 5: To apply the above changes, navigate to Deployment > Identity Experience Framework. Make sure that the **Auth Page Files **option is selected in the drop-down given in the left navigation panel and select the Custom CSS > Add New option.
The following pop-up appears:

Upload the updated CSS file or enter the URL and click the confirm button. To apply the above changes in the Profile page, make sure that the Profile Page Files option is selected in the drop-down given in the left navigation panel. Then upload the updated CSS file as explained above.
Remember Me
This section explains how you can configure and deploy the Remember Me feature on your IDX.
Pre-requisite: The Remember Me option should be enabled in the LoginRadius Admin Console as explained here.
Step 1: Navigate to Deployment > Identity Experience Framework. Make sure that the Auth Page Files option is selected in the drop-down given in the left navigation panel. Select the default Auth - Before Script option as displayed in the screen below:
Step 2: Add the following code in the "Auth -Before Script" of IDX:
// If found activated session, go to the callback function
var ssologin_options= {};

ssologin_options.onSuccess = function(response) {
// On Success
//Write your custom code here
console.log(response);
};

LRObject.util.ready(function() {

LRObject.init("ssoLogin", ssologin_options);

});
The above code will look for the Access Token stored in your customer’s browser. If found, your customer will be automatically logged in.
Note: LoginRadius uses SSO Login to facilitate the Remember Me option.
Implementing IDX as Pop-up
This section explains how you can implement the IDX as pop-up.
Step 1 : Add the following link on your webpage to open the IDX as a pop-up:
<button onclick="window.open('https://<LOGINRADIUS_SITE_NAME>.hub.loginradius.com/auth.aspx?action=login&return_url=<URL_TO_HANDLE_TOKEN>', 'myWindow', 'width=500, height=600')">SignIn</button>
Step 2: Upon login, you will get the access token in the Return URL (return_url<URL_TO_HANDLE_TOKEN>). You are required to handle the token's associated property. The following is an example of PHP code to handle the access token:
if (isset($_REQUEST['token']) && !empty($_REQUEST['token']))
{
$token = trim($_REQUEST['token']);
 //add all of your functionality here
}
Similarly, you can handle the access token in the language you are using for implementation.
Step 3: Upon login, you might need to close the pop-up and reload the parent window of your web application. To achieve the same, add the following code to the Index.html file of your web application:
window.onunload = refreshParent;
function refreshParent(){
    window.opener.location.reload();}
window.close();
Step 4: You are required to make the following code changes in the auth.aspx file to avoid opening multiple pop-up windows:
Locate the following code in the Auth - Before Script file:
<script type="text/html" id="loginradiuscustom_tmpl"><span class="lr-provider-label lr-sl-shaded-brick-button lr-flat-<#=Name.toLowerCase()#>" onclick=" return LRObject.util.openWindow('<#= Endpoint #>'); " title="Sign up with <#= Name #>" alt="Sign in with <#= Name#>"><span class="lr-sl-icon lr-sl-icon-<#= Name.toLowerCase()#>"></span>Login with <#= Name#> </span> </script>
Replace the above code with the following:
<script type="text/html" id="loginradiuscustom_tmpl"><a class="lr-provider-label lr-sl-shaded-brick-button lr-flat-<#=Name.toLowerCase()#>" href="<#= Endpoint #>&same_window=1" title="Sign up with <#= Name #>" alt="Sign in with <#= Name#>"><span class="lr-sl-icon lr-sl-icon-<#= Name.toLowerCase()#>"></span>Login with <#= Name#> </a></script>
Step 5: Save the file and you are done with setting up the IDX as a pop-up.
X-Frame-Options
HTTP headers carry extra information with HTTP responses or requests. The X-Frame-Options is used to prevent clickjacking attacks on the site, and it specifies whether a browser should be allowed to render a page in a <frame>, <iframe>, <embed>, or <object>. The frame-ancestors directive in Content-Security-Policy(CSP) has rendered X-Frame-Options obsolete.
Clickjacking
An attacker uses a transparent iframe within a window to trick a user into clicking on a call-to-action (CTA), such as a button or link, which redirects them to another server with a window that looks identical. The attacker intercepts and redirects the original server's clicks to the other server, effectively hijacking them. This attack is aimed at both the user and the website that they are visiting.

Syntax
X-Frame-Options: DENY
| Directives | Explanation |
|---|---|
| DENY | This will not allow to page rendering in the <frame>, <iframe>, <embed> or <object> |
However, if X-FRAME-OPTIONS is enabled from LoginRadius, in that case, there are two possibilities:
- If the parent website's domain is not whitelisted in Deployment > Apps > Web Apps, the X-FRAME-OPTIONS will return "deny". The Hosted page (IDX) cannot open in an iframe.
- The IDX can be opened in an iframe without restrictions if the parent domain is whitelisted in Deployment > Apps > Web Apps, and the X-FRAME-OPTIONS response header will not be sent.
Note: To enable X-Frame-Options, please contact LoginRadius Support.